Monday, December 19, 2011

Exploring Cricut Challenge

Hi Everyone!

TodayI have my project for the challenge over at Exploring Cricut . This weeks challenge is to use a pine, fir, evergreen, or christmas tree in any way (does not have to be Christmas related).


As soon as I read this I had the perfect idea! I have been missing going christmas tree hunting (my husband and I use a fake tree:( ), I haven't been able to go with my family for a couple of years now. The last time we went early when I was home for Thanksgiving (still in school)...well the tree ended up dying before Christmas, so we ended up using my 4' hot pink tree as our family Christmas tree!!

Anyway, back to the project. I used Paper Doll Dress Up for the tree and Just Because Cards for the truck. To make them look "snowy" I dabbed a Qtip in white ink and randomly inked the tree and truck.

Truck is cut at 5" and the tree at 2.5", card is a standard A2 size. The stamp is from My Pink Stampers Happiest Moments stamp set.


Hope you enjoyed this project!

~Sara~


Friday, December 16, 2011

Friday post for Exploring Cricut

Hi Everyone!

Life has been busy! But today I have a project for Exploring Cricut. I intended for this to be a card, but the size came out kind of small, I still might use it for a card, or I might use it for a tag/card for someone.

I used the stocking off of Doodlecharms and flood filled it on my Imagine with 2 patterns from the Mr. Frosty cartridge. Love how it turned out!  It was all cut at 4", then I just used a brad to form the card base!


Have a wonderful day!!

~Sara~


Friday, October 21, 2011

Exploring Cricut Daily Project

Hi Everyone!!


Today is my daily post for the Exploring Cricut blog! I have a quick little card for you today. I really wanted to cut this cute little giraffe from Create A Critter, so I decided to make it into a baby card.


The card base is 4"x4"
The giraffe was cut at 3"
All of the paper were scraps that I had!

Hope you enjoy this quick and simple card!

~Sara K~


Tuesday, October 11, 2011

Personalized Baby Boy Card

Are you surprised I'm getting caught up on my posts?!!?  Today I have a cute, personalized baby boy card I made for our friends who had their first child, is name is Rowan. This is another "Swing" or "Flip flop" card. You can find the video that I watched to learn this card style Here!


Hope you enjoyed this cute card!
~Sara k~

Sunday, October 9, 2011

1st Exploring Cricut Challenge

Hello Everyone!

Welcome to the very 1st Exploring Cricut Challenge!! Our first challenge is using the Art Philosophy cartridge. We were to use "square 3" on page 43 of the handbook, along with any 2 flowers on the cartridge. I knew EXACTLY what pictures and paper I wanted to use when I saw these cuts! I even ended up making 2 different layouts because I liked them so much.

This first layout I really challenged myself and only used 1 photo! I NEVER do this. I always have so many photos I want to scrap, so this was hard for me! I have never used an enlarged photo, in fact I usually crop them down! This is a 5x7 print, but it is one of my favorite photos, so I really wanted to make it stand out.
The square was cut at fit to page
The flowers are "flower 5" and "flower 6" p.29 cut at 2", 2.25", and 2.5", with the layers


 I knew these flowers, along with my background paper, were perfect for these cute pictures of my nephew, and ring bearer. Isn't he the cutest?!?!


Hope you enjoyed the first Exploring Cricut Challenge! We can't wait to see your submissions, so once you've finished checking out everyone's projects get creating!

Sara

Bridal Party Layout

Hi Everyone!

Today I wanted to share a layout I made a couple weeks ago of our Bridal Party. See, I really am crafting, just not up to date with posting!!


All cuts were from Wall Decor and More.
Monogram letters were cut at 1.5"
Regular letters were cut at 1"
Heart was cut at 3"


Have a great day!!
Sara Kate


Saturday, October 8, 2011

Exciting new Cricut Challenge Blog!!

I am so excited!!!
There is a brand new challenge blog that has gone live today!! And I'm a part of it. Check it out at Exploring Cricut. The first challenge will be Monday, October 10th. Make sure you mark your calendar and come back and join in on the fun.

There will be a challenge every other Monday. Each day, except for Sunday, there will be a post from one of the DT Members. Each post will feature a Cricut Cartridge. Each challenge will feature a certain cartridge and cut, but the daily postings will be random. Here is the awesome lineup of designers for this new challenge blog:
Go check out all of these talented ladies blogs, We can't wait to see you for the fun on Monday!
Sara

Thursday, September 29, 2011

Sketches In Thyme Design Team Call

Hi Everyone!!

Today I am posting a layout that I made for the Sketches in Thyme Design team call!! Sketches in Thyme posts 3 sketch challenges a month, super fun! Check it out Here

Here is the sketch for the design team call:
 

Here is my take on the sketch:


The paper is all from a Martha Stewart paper pack that I got a while back!
Hope you like it!

Have a great day!

~Sara~


Sunday, August 28, 2011

Birthday cards for a guy

Good Morning Everyone!

Ok so if you're like me, sometimes it just seems really hard to make a card for a guy. Well let me tell you, I've been on a roll with guys cards lately! We have alot of birthdays right now. This post I will share 3 different cards with you, 2 are somewhat similar, they were for my Father & Brother-in-law.


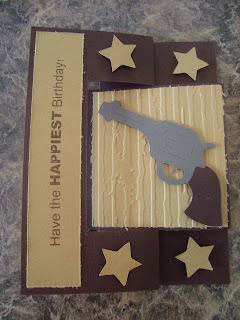
This first card is a "flip flop" or "swing" card. I had never saw this card style until I went to CHA in Chicago, I love it! This is going to be a long post, so I will post details on how to make this later.

The Gun was cut from Old West at 1 3/4"
The stars were cut at 1 1/4"
The stamp is from My Pink Stamper Fabulous Phrases stamp set


This next card is a standard A2 card.
The gun on this card was cut at 2"
The "wanted" poster background was cut at 4"
The stamp is from a 40:31 Creations stamp set


While at CHA I also stumbled upon Raisin Boat stamps. Have you heard of them? Not only do they have their own stamp line with over 200 sets, but they offer a "Netflix" type program for stamps!!! How cool is that?!?!?  Head on over Here to check them out! You will love them!


I made this A2 size card for my Brother-in-law using their "Born to Ride" stamp set, as well as their Brick background stamp. I love how this card turned out, and can you believe it, no Cricut! That doesn't happen very often!! To get the coloring of the brick I first covered the entire stamp in red ink, then went over it in spots with brown ink, I think it turned out pretty cool!!


The Happy Birthday sentiment is from a 40:31 Creation stamp set.


I hope you enjoyed these "guy" cards! 
Stayed tuned for a super cute "flip flop/swing" style Baby card!

Have a great day!
Sara Kate


Wednesday, July 20, 2011

I'm On a Roll -- Creative Critterz Imaginations Design Team Call

Good Morning Everyone!!

I JUST finished another layout from our honeymoon made entirely with my Imagine. I will be entering this layout in the Creative Critterz Imaginations Design team call. The Imagine Critterz blog is one of the reason I decided to get my Imagine. I wasn't so sure about it in the beginning, but then I started following this blog and saw just how awesome the Imagine can be. I'm hoping to become part of the Design Team and inspire others to create with the Imagine machine.


 All of the paper in this layout (with the exception of the airplane) was plain white when I started! All of the patterns are from the Cricut Imagine Hopscotch Cartridge.
The title "Getting There" was cut at 1.5" from the Cricut Robotz Cartridge and flood filled with a pattern from the Hopscotch Imagine cartridge. I chose the title because it was a LONG trip to St. Lucia. We left at 7:40 on June 13, spent the night in the Miami airport, and finally arrived in St. Lucia at 2pm on June 14!!  It was completely worth it though!


The airplane was cut at 2" from the Cricut Everyday Paper Dolls Cartridge using a scrap piece of cardstock.  The journaling tag was cut at 3.5" from the Cricut Imagine More cartridge. I "cached" a pattern from the Hopscotch cartridge onto my Imagine so that I could flood fill this image.

If you are not familiar with "caching" a pattern onto the Imagine, it's super easy! All you have to do is open an image and edit it. When you are choosing the pattern if you just hold your stylus on the pattern it will pop up with a box that says "cache." Once you cache the image you can then remove that Imagine cartridge, insert another Imagine cartridge, and mix and match your patterns and cuts! I hope that made sense! Maybe I will do a quick video of it for you soon!!

I hope you like my layout! I'm so excited with how these are turning out, and happy that I've finally got into the groove in getting them scrapped! Don't forget to scroll down to see my previous post for the My Pink Stamper Design team!

Have a great day! I'm off to bed!
~Sara Kate~

Tuesday, July 19, 2011

Honeymoon Scrapbook Title Page -- MPS Design Team Entry

Hi Everyone!!!

Today I wanted to share with you the title page for our Honeymoon Scrapbook. I am also submitting this layout for a chance to be on Robyn, My Pink Stamper 's Design Team!!  For her design team call Robyn issued a challenge for the entries, here were the rules:

*You will need to have a blog that you regularly post on for at least 3 months.
*You cannot already be serving on a DT that has product that is a conflict of interest (most DTs are just fine as long as they do not sell product that is similar to My Pink Stamper Original Cricut Stamps idea)
*Your project must be made just for this challenge
*Post a pic on your blog with a full recipe along with what the challenge is about
*This needs to be a new project that you make just for this challenge
*Only one entry per person, please
*You do not need to be a professional but you must have a love for the craft! :)

Challenge: Make a card, scrapbook page, or other Cricut project with your favorite Cricut cartridge using the following colors......

Orange
Turquoise
Green
Brown
(other optional color of your choice)
 
Here is my scrapbook page!!

 The title "Honeymoon" was cut at 1.5" from Cricut Life's A Beach cartridge, one of my fave's!!
The paper for the titles were in my stash, most of the background papers and the crab are Bazill Dotted Swiss paper, I just LOVE that paper!!

 "St. Lucia" was cut at 2"
The palm tree was cut at 3.5" and the beach chair was cut at 2"
All were from Cricut Life's A Beach cartridge!
The cute little crab and sand castle were both cut at 1.5" from Cricut Create A Critter Cartridge, my other fave!

 The "No Pressure, No Problem" stamp is from a 40:31 Creations Stamp set, which are no longer available.  But the motto in St. Lucia is "No Pressure, No Problem" so it was perfect!!
I stamped it in Versamark to give the effect that it was written in the "sand"!!


I LOVE how this layout turned out!! Hopefully Robyn does too =P

Have a great day!!!
~Sara Kate~
 

Sunday, July 17, 2011

Finally Settled!

Good Morning Everyone!!


I know it's been a while since I last posted, but we are finally moved into our house and all settled in!! I wanted to share some pics with you of my scrap room so far! It's not done yet, just enough that I can get in there and create when I want to!!


I just love that wall with the pink over the green!! 
Also, did I mention that the night before we closed on our house we got a new puppy?!?! I know, we're crazy!! Meet Winchester, he is an English Mastiff. He is currently 3.5 months old and a whopping 50 pounds!! He's gonna be a big boy! Definitely a different change from our 3 year old, 24 pound Boston Terrier, Remington that I've shared pictures of before. We love them both, and they love each other!!!


Well, I think you are all caught up on what has been going on here and why I haven't posted! I think things have finally settled down now! I mean really what is left? This year we got married, graduated college, bought a car, got a new puppy, and bought a house! I think it's time for a little slow down and some time to enjoy each other and the things that we love to do! So be watching for some more posts as I get back into the swing of things!! 

Don't miss my last post of my nieces bday card!


Have a great day! It's 7am and I'm off to bed! I'm a nurse and work night shift, so my sleep schedule is crazy! But I love my job and the kiddos that I work with, so it makes it all worthwhile!

~Sara Kate~


Birthday Card for my Niece

Hello Everyone!! 

I wanted to share a quick birthday card that I made for my niece with you. For her birthday she wanted to come spend some time at our house and go to the zoo and a museum, so I made her this cute "slumber party" card and got her a little bag filled with little travel shampoos, etc.


This card was made with the Best Friends Cricut Imagine Cartridge.  The scalloped background was printed and cut at 4"  The people were cut at 2" and the "slumber party" icon was cut at 1.5". The card base is a standard A2 size card that I then trimmed down a bit to fit the 4" scalloped square.

I hope you like it! I know she did!

~Sara~

Sunday, May 29, 2011

New 40:31 Creations Stamps!! --- late post

****Update: Unfortunately the 40:31 Creations design team had to come to an end. Lauren is a busy lady and was unable to continue on with her stamp adventure. Let's hope that she will be able to pick it up again later, she's got some great talent! Good Luck Lauren!

Hi Everyone,

As this is posting we are currently closing on our first house and started to paint and move. Not to mention yesterday we got a new puppy! (English Mastiff)  I know, we're crazy!!!

But I'm excited to share a card with you that I made using 2 of the new 40:31 Creations stamps! Here is a picture of the 2 new stamp sets:


Now, onto my card. I have to admit this was a pretty fast card. All of my scrapping stuff was just about packed when I found out we were getting new stamps to play with!  I also appologize for the pictures, my camera cord was packed so I had to take pictures on my phone!

I made this card with the JT Imagine cartridge that I just got for my birthday. My parents are HUGE motorcycle fans, so this image is perfect for them. I know I will be busy for a while, so I decided to make it into a Fathers Day card and use the "#1 Dad" and "its your day" stamps.  I was also tempted to just have it say "Enjoy the Moment".... sooo many good stamps on these sets!!!  The image was cut at 3.5" true size, which turned out to be a bit big, but I decided to just go with it! Needless to say, it is really long so the card base measures 4"x8.5"!!!!!  It's pretty big, yet I really like it!


The background paper is a piece of Bazzill Dotted Swiss paper.


I hope this helps get you in the mood for Father's Day projects!  
Now head on over to 40:31 Creations to see how to order your stamps!

~Sara Kate~

Tuesday, May 3, 2011

Mother's Day Cards

Hello Everyone!

Today I have 2 Mother's Day cards to share with you. It's ok that I'm posting early, we celebrated Mothers day early with our moms :)

The first card I decided to attempt my first paper rosette. Super simple, love it! If you're not familiar with them, there are TONS of helpful videos on YouTube! The paper was from a stack I have, I appologize I'm not sure which one and I recently packed up my scrapbook room to move to our first house so I can't look :(  The stamp is from My Pink Stampers "Happiest Moments" stamp set.


The next card is my favorite card that I have made in a LONG time. And I made it after having worked 12 hours and only sleeping for about 3 hours afterwards!! Maybe I work better tired!

The little chickie is cut from Create a Critter at 3.5" I added a little gem to the flower in her hair just for some flair. The paper is just something I've had in my scrap bin. For the ribbon I used my Tim Holtz Tiny Attacher to get the ruffled look, love it!!  I used the same stamp from MPS "Happiest Moments" stamp set.


Hope this gives you a little inspiration if you still have Mother's Day gifts to work on!
Have a great day!!
~sara~

Wednesday, April 27, 2011

Beer Mug Card

Hi Everyone!!

Today I wanted to share a card that I made for my Brother-in-law's birthday. His birthday is St. Patricks Day, so I thought something to do with beer would be perfect. I made this beer mug shaped card on my Gypsy. I welded 2 4" beer mugs from Smiley Cards together ( I HIGHLY recommend making this larger, it looked much bigger on the gypsy than cut out).


I used my Cuttlebug and ran the "foam" through the D'vine swirls embossing folder to give it some texture. I the ran the mug part through the distressed stripes embossing folder. I inked the entire thing with tea dye distress ink to help the embossing stand out.

Hope you enjoyed this!
~Sara Kate~